In 2023 a slew of gaming laptops were launched with a 16:10 ratio resolution. This gives more screen real estate for people like me who also do development/coding.
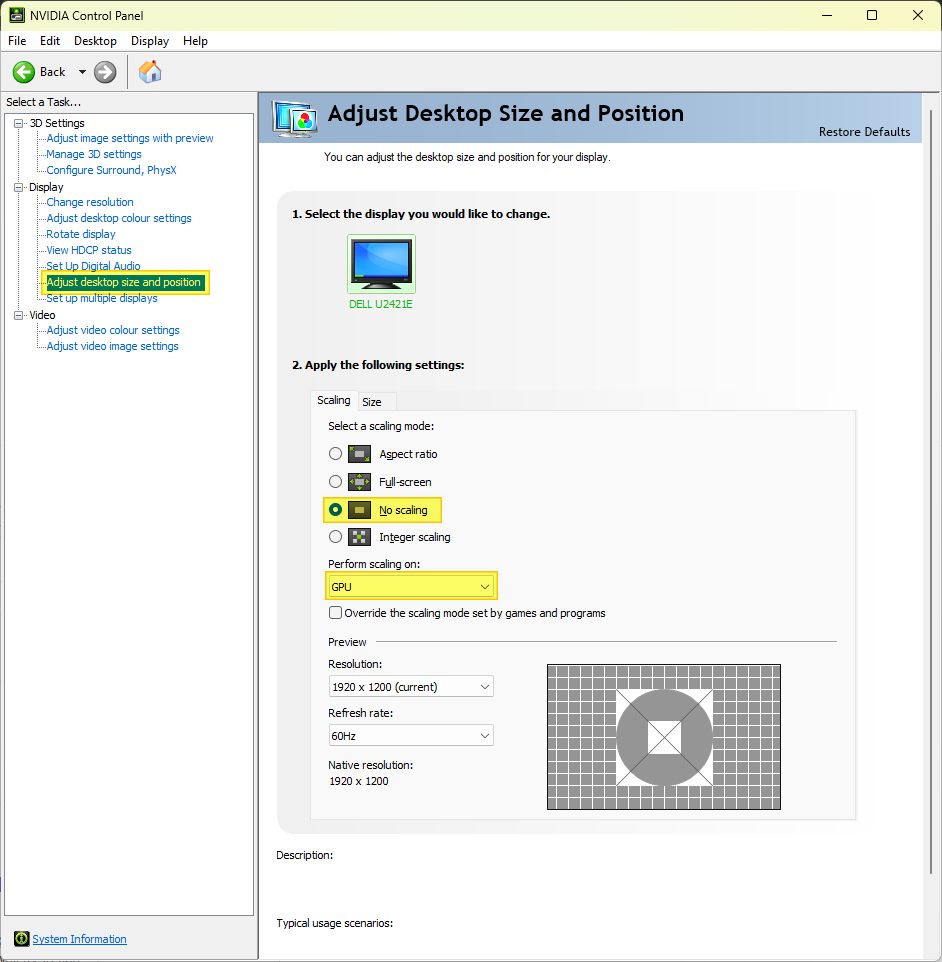
When you do a game capture like Nvidia’s game capture, with a screen resolution based of 16:10 and import that into video editing software like DaVinci Resolve, it will add black bars if you set the project resolution to 16:9 ratio.
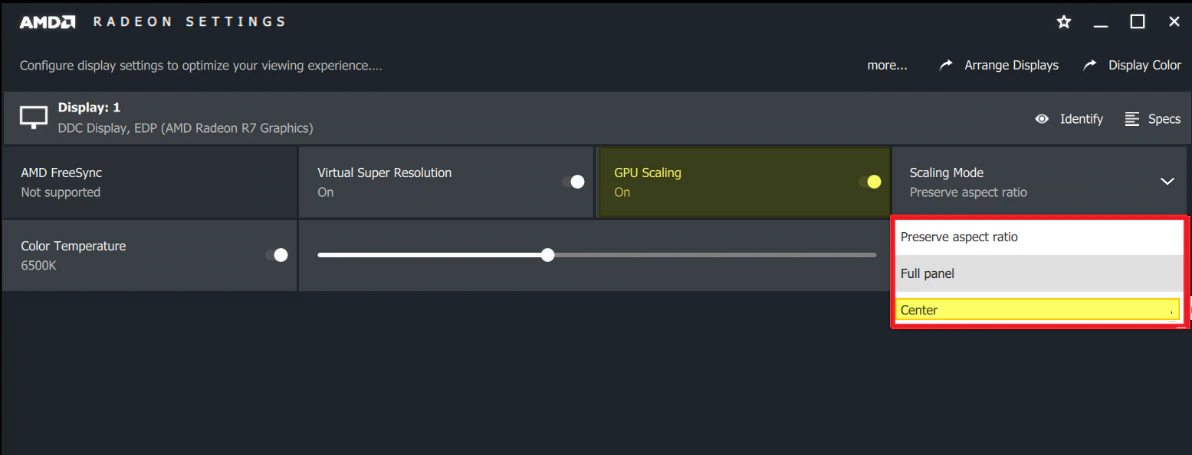
The following solutions will result in a game capture of 16:9 ratio. In addition to this, this also will use the native resolution of the monitor since the scaling is applied at the GPU level and not in the monitor.
When configuring Thunderbird with Outlook 365 account, the password fails when using IMAP account type.
I use multi factor authentication and hence this is little difficult than using plain old password. The following configuration is the recommended method across almost all articles in the Internet, but still the password will fail. There is a solution which I came across in the forums, which worked for me and I’m documenting it here.
IMAP configuration
Incoming server configuration
outlook.office365.com
SSL/TLS
Port 993
OAuth2
Full email address as username
SMTP server configuration
smtp.office365.com
STARTTLS
Port 587
Full email address as username
User configuration at Microsoft Admin Center
Go to tenant admin center. The URL at the time of writing this article is https://admin.microsoft.com.
Go to Users > Active users.
Click/press on the user who has get the incorrect password error.
In the properties panel, click/press the “Mail” tab.
Under the “Email apps” section, click the link “Manage email apps”.
Look at the check box “Authenticated SMTP”.
Check it if not already checked. If already checked, un check it, press save changes, follow the above steps and check it again.
Finally save the changes.
Wait for some 5 to 15 minutes.
Now try adding the account in Thunderbird and most probably this should resolve the issue.
For me the app password didn’t work but the above with OAuth worked!
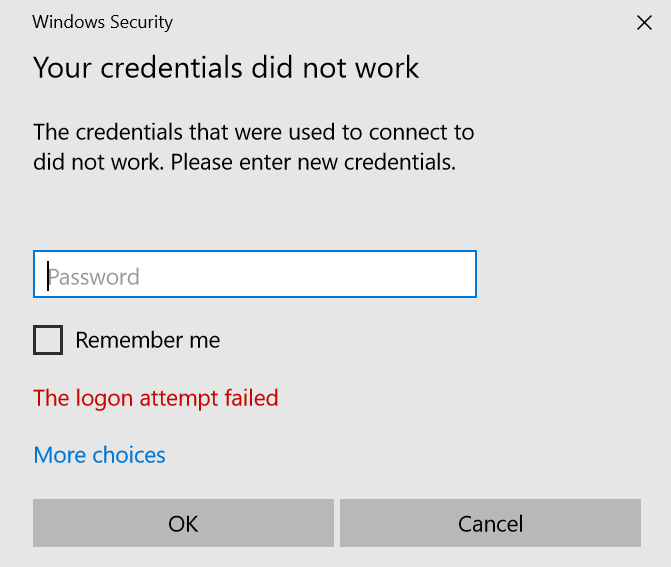
I’m trying to login to my remote PC and I get the error “Logon attempt failed”.
The following are the various user IDs I tried and none of them worked.
user@domain.com
AzureAD\user@domain.com
AzureAD\user
Solution
Save an RDP connection as file with parameters like name of the PC.
Open the RDP file using a text editor like notepad.
Modify the entry “authentication level” to “authentication level:i:0”
Make sure the “Allow connections only from computers running Remote Desktop with Network Level Authentication” is unchecked in the remote machine’s settings.
Add the entry “enablecredsspsupport:i:0”.
Now save the file.
Run the RDP file and it should connect to remote machine and show you the login screen of the remote machine
Type in the username as AzureAD\user@domain.com
Password as login password and not the Windows PIN.
A post describing SharePoint’s high resource usage and how Windows 8’s Boot to VHD will help to run SharePoint host with more dedicated resource.
Trailer….
For people like me who has to depend on resource hungry SharePoint servers, life is difficult as a developer and IT designer.
Most of the time we have to run the server inside a virtual environment and most of the time it would be a standalone server.
The problem….
Initially with SharePoint 2010 you could get away with at-least 6GB RAM allocated to a guest OS. But with SharePoint 2013 you require at least 12GB for a better experience and most of the machines come with 8GB or 16 GB RAM.
The problem is, your host OS will take at least 2GB RAM which for SharePoint can make life and death kind of experience even though Windows is perfectly capable of keeping SharePoint alive with paging (Virtual RAM) and have the storage drive on a never ending marathon run !
For virtual environment, the following are the options we generally have.
Microsoft Virtual PC (Free)
VMWare Workstation (Costly)
Oracle Virtualbox (Free)
Windows Server 2008/2012 R2’s Hyper-V (Super Costly)
Out of these, VirtualPC and Hyper-V natively use VHD container format for guest OS. Others too have these (Thanks to Microsoft’s Open Specification Promise) but mostly they use proprietary format.
When Windows 7 was rolled out, the Enterprise & Ultimate editions had the native Boot-to-VHD support.
What is Boot To VHD ?
Refers to the ability of a physical computer to mount and boot from an operating system contained within a VHD – (PS: Shamelessly copied the text from wikipedia)
Again to the problem….
Consider a scenario where you own a VM host system with 8GB RAM and run a VM guest with 6GB RAM for SharePoint 2010. This worked mostly fine. Then comes the SharePoint 2013 which requires even more ram, at-least 2GB in addition. Now you are in soup, you can wait forever to see the guest OS, aka Windows Server 2008 R2 or Windows Server 2012’s desktop to show up!
Solution….
Gain as much RAM as possible from host or upgrade the system to have more RAM. You will be in luck for desktop systems. Laptops, you are mostly in trouble.
Windows 7…..
Luckily with Windows 7(Enterprise/Ultimate) you could boot physical computer to a VHD and utilize all the resources. That’s good news, now you have all the RAM available for the SharePoint. The bad news is Enterprise is available for volume licensing only and Ultimate prohibitively costly.
Windows 8…..(forget Windows 8 RT, that thing can’t even run a standalone app!, but still a good OS for daily basic usage, so Microsoft is forgiven!)
Then comes Windows 8 with even more simpler editions. A regular version, professional version & an enterprise version. Compared to Windows 7, Windows 8 Pro is affordable and can be bought by an individual.
The best news is, Windows 8 Pro comes with Client Hyper-V and supports Boot To VHD.
So now as an indie SharePoint developer, you have a host OS which can be bought, has a virtualization capability and supports Boot To VHD.
Assuming you bought the host OS, i.e. Windows 8 Pro, its time to utilize it for better SharePoint development experience. PS: I am going to explain only Boot-to-VHD part. Enabling Hyper-V in Window 8 Pro or installing SharePoint are out of scope for this post. Get help from trusted friend Google’s Search or Microsoft’s Bing.
After a long story…Main Picture…..
Enabling boot-to-VHD…..
Create a VM Guest using Hyper-V and make a note of the location where the VHD file is located.
In VM Host, go to Control Panel, Administrative Tools, Computer Management. Go to Disk Management under Storage.
In Action menu, click Attach VHD. Now you should have a volume with drive letter. Make a note of the drive letter. In this case it’s D:\
Now launch a command prompt as administrator.
Take a backup of current boot information by using the following command
bcdedit /export C:\bcdcurrentbackup
Now let’s add the VHD’s Windows to boot by using the following command (The drive letter we noted will be used here)
bcdboot D:\Windows
Reboot the machine and you should be able to see the multi boot screen.
Choose the SharePoint’s guest OS to boot.
You can use bcdedit command to rename the description of the Windows in multi boot screen.
Removing boot-to-VHD…
Open command prompt in admin mode
As mentioned in point 5 above take a backup of the boot system file
View list of current boot entries by typing the following
bcdedit
Make a note of the guid in the entries. In this case it’s {4ff0aa40-b17f-11e3-beaa-bc5ff4cf029e}