
March 30, 2016 / Kannan / 0 Comments
SharePoint Online Authentication
The following is the interaction between
- Client Computer
- Office 365
- Azure Active Directory (Azure AD)
- On premise Active Directory Federation Service (AD FS) (if available)
Notes:
- The customer can use either On Premise AD FS or any identity provider or they can use Azure AD
- The root Federation Authentication (rtFA) cookie is used across all of SharePoint Online. When a user visits a new top level site or another company’s page, the rtFA cookie is used to authenticate them silently without a prompt. When a user signs out of SharePoint Online, all SharePoint Online cookies are deleted.
Authentication Process
- User does anonymous request to secured O365 SharePoint Webpage (SharePoint.com)
- The SharePoint then requests the default identity provider or Azure AD to authenticate the user
- Azure AD then requests the user to provide credentials i.e email and password
- Azure AD then decides based on the email id, which identity provider to use, either itself or on prem AD FS
- User types in the credentials and sends back to AD FS using the client computer
- The on-prem AD FS or Azure AD then validates the credentials
- If on-prem AD FS is the provider, then it provides an auth token back to Azure AD post validating the user
- If Azure AD is the provider, then it generates the auth token
- In both the cases, Azure AD generates an auth token, stores it in client computer and redirects user back to SharePoint online
- O365 SharePoint server then validates this auth token with Azure AD
- O365 SharePoint then creates root Federation Authentication (rtFA) cookie and Fedauth cookie to client computer
- This rtFA cookie is used by the computer for subsequent requests
For more information visit https://support.office.com/en-us/article/SharePoint-Online-authentication-77965e8d-48ad-47bd-a656-57f17d6d1cc7?ui=en-US&rs=en-US&ad=US
March 30, 2016 / Kannan / 0 Comments
SharePoint 2013 – SAML Based Authentication
The following is the interaction between
- Client Computer
- SharePoint Server
- Active Directory Federation Service (AD FS)
- Active Directory Domain Service (AD DS)
Notes:
- AD FS & SAML Claims are not required if AD DS is the provider in which the forest and domains trust each other
- AD FS must trust the AD DS for which the AD FS is issuing the SAML security tokens
- Here the trust might be implicit as the AD FS is the member of AD DS domain and hence trusts the domain controllers
- AD FS must also trust the SharePoint locations
- Hence AD FS is configured with SharePoint’s web application URLs as relying parties
- SharePoint server also must trust the AD FS’s SAML token.
- This trust is obtained via a signed certificate which the AD FS has and it signs the tokens with this certificate
- The SharePoint server is also configured with the public portion of the above mentioned signed certificate which AD FS uses and SharePoint trust those signed tokens using this public portion
The SAML Based Authentication Process
- User does anonymous request to secured SharePoint Webpage
- SharePoint redirects the user to AD FS’s login page for user to enter credentials
- User types in the credentials and sends back to AD FS using the client computer
- The AD FS server then validates the credentials with AD DS
- Once user is validated, the AD FS then creates a SAML token, signs and send it back to client computer
- The client computer now sends a new request to SharePoint server now with SAML token provided by AD FS
- SharePoint then creates a claims based security token using Security Token Service and this claims is based on the claims which it found in SAML token which the AD FS has sent to client computer
- Then SharePoint stores this security token with Distributed Cache Service on the farm
- SharePoint server then generates and send the federated auth cookie back to client computer
- The fed auth cookie has encryped key or index to security token
- This fed auth cookie is used by the computer for subsequent requests
The following Video will explain the Forms based authentication in SharePoint 2013. This video is part of the Authentication overview for SharePoint 2013 article located at https://technet.microsoft.com/en-us/library/jj219571.aspx
For more information on SharePoint Claims check out more articles at http://social.technet.microsoft.com/wiki/contents/articles/14214.sharepoint-2013-claims-based-authentication.aspx
March 30, 2016 / Kannan / 0 Comments
SharePoint 2013 Authentication – Forms Based
The following is the interaction between
- Client Computer
- SharePoint Server
- ASP.NET Membership provider
The Form Based Claims Authentication Process
- User does anonymous request to secured SharePoint Webpage
- SharePoint responds with form based login page
- User types in the credentials and sends back using the client computer
- SharePoint server then validates the credentials with membership provider
- SharePoint server then queries the roles provider for user’s associated roles
- This becomes the role claims for user’s account
- SharePoint then creates a claims based security token using Security Token Service
- Then SharePoint stores this security token with Distributed Cache Service on the farm
- SharePoint server then generates and sends the federated auth cookie back to client computer
- The fed auth cookie has encrypted key or index to security token
- This fed auth cookie is used by the computer for subsequent requests
The following Video will explain the Forms based authentication in SharePoint 2013. This video is part of the Authentication overview for SharePoint 2013 article located at https://technet.microsoft.com/en-us/library/jj219571.aspx
For more information on SharePoint Claims check out more articles at http://social.technet.microsoft.com/wiki/contents/articles/14214.sharepoint-2013-claims-based-authentication.aspx
March 30, 2016 / Kannan / 0 Comments
SharePoint 2013 – Windows Claims Authentication
The following is the interaction between
- Client Computer
- SharePoint Server
- Active Directory Domain Service
The Windows Claims Authentication Process
- User does anonymous request to secured SharePoint Webpage
- SharePoint requests back Windows Credentials (It can be a NTLM or Kerberos or basic)
- If user is in intranet zone, the browser sends back the logged in credentials to SharePoint, else user is prompted for credentials
- For both the cases the browser send back the credentials to SharePoint
- SharePoint then validates this credentials with Active Directory Domain Services (AD DS)
- AD DS then responds back to SharePoint with Windows Security Token
- SharePoint then checks, to which security groups the user belongs in AD DS
- SharePoint then creates a claims based security token using Security Token Service
- Then SharePoint stores this security token with Distributed Cache Service on the farm
- The IIS Server in SharePoint server then send the auth code to the user’s computer
- The client computer then uses this auth code for subsequent requests
The following Video will explain the Windows claims authentication in SharePoint 2013. This video is part of the Authentication overview for SharePoint 2013 article located at https://technet.microsoft.com/en-us/library/jj219571.aspx
For more information on SharePoint Claims check out more articles at http://social.technet.microsoft.com/wiki/contents/articles/14214.sharepoint-2013-claims-based-authentication.aspx
March 22, 2016 / Kannan / 0 Comments
When we try to execute a custom java script code in SharePoint content editor web part, it may not work. The reason behind is that, there might be a conflict occurring during load.
Microsoft provides ways to launch your function after full page load and following is one of the method.
<script type="text/javascript">
    _spBodyOnLoadFunctionNames.push("LaunchCustomCode");
    LaunchCustomCode = function() {
		ExecuteOrDelayUntilScriptLoaded(MyCode, "sp.js");
	}

	MyCode = function() {
	console.log('My Code Start');
        alert('MyCode Called');
        console.log('My Code Finish');
	}

</script>
March 10, 2016 / Kannan / 0 Comments
While working on designing display template for drop down based refiners in SharePoint Search there was a requirement to show counts along with refiners in refiners list.
Following is the change which I made in the refiner’s display template.
Actual code
<option value='_#= onChangeOrClick =#_'>_#= $htmlEncode(refinementName) =#_</option>
Updated Code
<option value='_#= onChangeOrClick =#_'>_#= $htmlEncode(refinementName) =#_ (_#= refinementCount =#_)</option>
March 8, 2016 / Kannan / 0 Comments
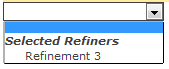
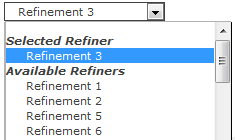
Recently one of the customer had a strange request where the customer wanted to Hide “Available Refiners” in SharePoint search refinement panel.
The “Available Refiners” is available in “Drop Down” type refinement panel.
When the refinement panel is being loaded, SharePoint executes a JavaScript function named AddPostRenderCallback. This would be available in the Refinement Display Template located under MasterPage/Search Gallery. The actual method looks like below code which is taken from O365.
AddPostRenderCallback(ctx, function() {
    if (hasAnyFiltertokens) {
        // Get the hidden block
        var hiddenOptions = document.getElementById(hiddenBlockID).children;
        var unSelGroup = document.getElementById(unselDD);
        var selGroup = document.getElementById(selDD);
        // Clone all the elements from the hidden list to the unselected option group
        for (var i = 0; i < hiddenOptions.length; i++) {
            var selectedElm = GetAllElementsWithAttribute(selGroup, 'value', hiddenOptions[i].getAttribute('value').replace('updateRefinersJSON', 'removeRefinementFiltersJSON'));
            if (selectedElm === null || selectedElm.length <= 0) {
                var cloneElm = hiddenOptions[i].cloneNode(true);
                unSelGroup.appendChild(cloneElm);
            }
        }
    }
});
To the above original code I made a small change so that “Clone all the elements” code executes only when user has selected a refiner.
// Clone all the elements from the hidden list to the unselected option group
if(selectedFilters.length <= 0)
{
	for (var i = 0; i < hiddenOptions.length; i++) {
		var selectedElm = GetAllElementsWithAttribute(selGroup, 'value', hiddenOptions[i].getAttribute('value').replace('updateRefinersJSON', 'removeRefinementFiltersJSON'));
		if (selectedElm === null || selectedElm.length <= 0) {
			var cloneElm = hiddenOptions[i].cloneNode(true);
			unSelGroup.appendChild(cloneElm);
		}
	}
}
To the above orignal code I added the following code to hide the “Available Refiners” option.
if(selectedFilters.length > 0)
{
	if(unSelGroup!=null)
	{
		unSelGroup.style.display = 'none';
	}
}
The above code will hide the “unSelGroup”‘s “Option Group” HTML to hide the Options for “Available Refiners”.
Final code would look like below.
AddPostRenderCallback(ctx, function() {
    if (hasAnyFiltertokens) {
        // Get the hidden block
        var hiddenOptions = document.getElementById(hiddenBlockID).children;
        var unSelGroup = document.getElementById(unselDD);
        var selGroup = document.getElementById(selDD);
        // Clone all the elements from the hidden list to the unselected option group
        if(selectedFilters.length <= 0)
        {
            for (var i = 0; i < hiddenOptions.length; i++) {
                var selectedElm = GetAllElementsWithAttribute(selGroup, 'value', hiddenOptions[i].getAttribute('value').replace('updateRefinersJSON', 'removeRefinementFiltersJSON'));
                if (selectedElm === null || selectedElm.length <= 0) {
                    var cloneElm = hiddenOptions[i].cloneNode(true);
                    unSelGroup.appendChild(cloneElm);
                }
            }
        }
        //Added for Gold Asset requirement where once a refiner is selected the "Avaialble Refiners" item should be made hidden
        if(selectedFilters.length > 0)
        {
            if(unSelGroup!=null)
            {
                unSelGroup.style.display = 'none';
            }
        }

        var refinerUpArrow = document.getElementById('refinerExpandCollapseArrow');
        if(refinerUpArrow!=null)
        {
            refinerUpArrow.style.display = 'none';
        }

    }
});
End Result is following

March 7, 2016 / Kannan / 0 Comments
Recently I had a requirement for OOTB search Box + Result where the customer wanted to clear the search results regardless of any refinement selected or not.

To implement this, in the display template HTML the following was added.
Do note that if refinements are there, the commented single line of code didn’t work and I had to replace the entire # as blank. Do check the original source (mentioned below) for more information.
<!--#_
    clearSearchResults = function()
    {
        var hash = window.location.hash;
        if( hash.indexOf('Default') == 1 ) {
            hash = unescape(hash);
            var kIdx = hash.indexOf('"k":');
            var rIdx = hash.indexOf('","');
            var query = hash.substring(kIdx+5,rIdx);
            query = query.replace(/\\/g, '');
            //window.location.href = window.location.pathname + window.location.search + '#k=' + escape(query);
            window.location.href = window.location.pathname + window.location.search + '#';
        } else {
            window.location.href = window.location.pathname + window.location.search + "#";
        }
    }
_#-->
<div id="ClearSearch" class="ms-alignCenter">
    <h2><a onclick="clearSearchResults();"  style="cursor:pointer">Clear/Reset All</a></h2>
</div>
The source for the above code is Add a “Clear Filters” link to your search page in SharePoint 2013