July 11, 2016 / Kannan / 0 Comments
In SharePoint 2013 search results, the icon for a file type like .msg, .txt shows up as .html icon.
In SharePoint 2010 this was overcome by mapping the icon file type in DocIcon.xml at WFE Servers.
But now since access to WFE servers are restricted in on-prem environment and no access in O-365 environment, the only solution available is to do the following.
- Edit the existing display template (I use custom display template with results shown in table and following is based on that) or create a new template for existing for the following located at (SiteCollection/All Files/_catalogs/masterpage/Display Templates/Search) accessible by using SharePoint Designer.
- xxxSearchTableResults.html
- xxxSearchTableItem.html
- Add the following codes and it should show correct icons.
Search Results Display Template:
<div style="width:15px;display:table-cell;text-align:left;font-weight:bold;padding: 5px 0px 4px 10px;">
</div>
Search Item Display Template:
<div style="min-width:16px;max-width:16px;display: table-cell;white-space:nowrap;overflow:hidden;-ms-text-overflow:ellipsis;-o-text-overflow:ellipsis;text-overflow:ellipsis;">
<!--#_
 var extObj = new Object();
extObj["FileExtension"] = ctx.CurrentItem.FileExtension;
 var iconUrl = SP.Utilities.HttpUtility.htmlEncode(Srch.U.ensureAllowedProtocol(Srch.U.getIconUrlByFileExtension(extObj, null)));
if(ctx.CurrentItem.IsContainer)
iconUrl = "/_layouts/15/images/icdocset.gif";
if(ctx.CurrentItem.FileExtension === "msg")
iconUrl = "/_layouts/15/images/icmsg.gif";
//console.log(ctx.CurrentItem.FileExtension);
 _#-->
<img id="_#= $htmlEncode(id + Srch.U.Ids.icon) =#_" onload="this.style.display='inline'" src='_#= iconUrl =#_' />
 </div>
Notes:
ctx.CurrentItem.FileExtension always return the file extension name which seems to match with the file name in the /_layouts/15/images/ folder.
For example msg = icmsg.gif or icmsg.png
Once done, the search results will show-up as following

March 22, 2016 / Kannan / 0 Comments
When we try to execute a custom java script code in SharePoint content editor web part, it may not work. The reason behind is that, there might be a conflict occurring during load.
Microsoft provides ways to launch your function after full page load and following is one of the method.
<script type="text/javascript">
    _spBodyOnLoadFunctionNames.push("LaunchCustomCode");
    LaunchCustomCode = function() {
		ExecuteOrDelayUntilScriptLoaded(MyCode, "sp.js");
	}

	MyCode = function() {
	console.log('My Code Start');
        alert('MyCode Called');
        console.log('My Code Finish');
	}

</script>
March 10, 2016 / Kannan / 0 Comments
While working on designing display template for drop down based refiners in SharePoint Search there was a requirement to show counts along with refiners in refiners list.
Following is the change which I made in the refiner’s display template.
Actual code
<option value='_#= onChangeOrClick =#_'>_#= $htmlEncode(refinementName) =#_</option>
Updated Code
<option value='_#= onChangeOrClick =#_'>_#= $htmlEncode(refinementName) =#_ (_#= refinementCount =#_)</option>
March 8, 2016 / Kannan / 0 Comments
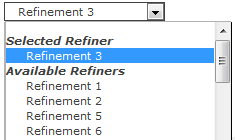
Recently one of the customer had a strange request where the customer wanted to Hide “Available Refiners” in SharePoint search refinement panel.
The “Available Refiners” is available in “Drop Down” type refinement panel.
When the refinement panel is being loaded, SharePoint executes a JavaScript function named AddPostRenderCallback. This would be available in the Refinement Display Template located under MasterPage/Search Gallery. The actual method looks like below code which is taken from O365.
AddPostRenderCallback(ctx, function() {
    if (hasAnyFiltertokens) {
        // Get the hidden block
        var hiddenOptions = document.getElementById(hiddenBlockID).children;
        var unSelGroup = document.getElementById(unselDD);
        var selGroup = document.getElementById(selDD);
        // Clone all the elements from the hidden list to the unselected option group
        for (var i = 0; i < hiddenOptions.length; i++) {
            var selectedElm = GetAllElementsWithAttribute(selGroup, 'value', hiddenOptions[i].getAttribute('value').replace('updateRefinersJSON', 'removeRefinementFiltersJSON'));
            if (selectedElm === null || selectedElm.length <= 0) {
                var cloneElm = hiddenOptions[i].cloneNode(true);
                unSelGroup.appendChild(cloneElm);
            }
        }
    }
});
To the above original code I made a small change so that “Clone all the elements” code executes only when user has selected a refiner.
// Clone all the elements from the hidden list to the unselected option group
if(selectedFilters.length <= 0)
{
	for (var i = 0; i < hiddenOptions.length; i++) {
		var selectedElm = GetAllElementsWithAttribute(selGroup, 'value', hiddenOptions[i].getAttribute('value').replace('updateRefinersJSON', 'removeRefinementFiltersJSON'));
		if (selectedElm === null || selectedElm.length <= 0) {
			var cloneElm = hiddenOptions[i].cloneNode(true);
			unSelGroup.appendChild(cloneElm);
		}
	}
}
To the above orignal code I added the following code to hide the “Available Refiners” option.
if(selectedFilters.length > 0)
{
	if(unSelGroup!=null)
	{
		unSelGroup.style.display = 'none';
	}
}
The above code will hide the “unSelGroup”‘s “Option Group” HTML to hide the Options for “Available Refiners”.
Final code would look like below.
AddPostRenderCallback(ctx, function() {
    if (hasAnyFiltertokens) {
        // Get the hidden block
        var hiddenOptions = document.getElementById(hiddenBlockID).children;
        var unSelGroup = document.getElementById(unselDD);
        var selGroup = document.getElementById(selDD);
        // Clone all the elements from the hidden list to the unselected option group
        if(selectedFilters.length <= 0)
        {
            for (var i = 0; i < hiddenOptions.length; i++) {
                var selectedElm = GetAllElementsWithAttribute(selGroup, 'value', hiddenOptions[i].getAttribute('value').replace('updateRefinersJSON', 'removeRefinementFiltersJSON'));
                if (selectedElm === null || selectedElm.length <= 0) {
                    var cloneElm = hiddenOptions[i].cloneNode(true);
                    unSelGroup.appendChild(cloneElm);
                }
            }
        }
        //Added for Gold Asset requirement where once a refiner is selected the "Avaialble Refiners" item should be made hidden
        if(selectedFilters.length > 0)
        {
            if(unSelGroup!=null)
            {
                unSelGroup.style.display = 'none';
            }
        }

        var refinerUpArrow = document.getElementById('refinerExpandCollapseArrow');
        if(refinerUpArrow!=null)
        {
            refinerUpArrow.style.display = 'none';
        }

    }
});
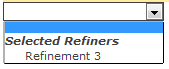
End Result is following

March 7, 2016 / Kannan / 0 Comments
Recently I had a requirement for OOTB search Box + Result where the customer wanted to clear the search results regardless of any refinement selected or not.

To implement this, in the display template HTML the following was added.
Do note that if refinements are there, the commented single line of code didn’t work and I had to replace the entire # as blank. Do check the original source (mentioned below) for more information.
<!--#_
    clearSearchResults = function()
    {
        var hash = window.location.hash;
        if( hash.indexOf('Default') == 1 ) {
            hash = unescape(hash);
            var kIdx = hash.indexOf('"k":');
            var rIdx = hash.indexOf('","');
            var query = hash.substring(kIdx+5,rIdx);
            query = query.replace(/\\/g, '');
            //window.location.href = window.location.pathname + window.location.search + '#k=' + escape(query);
            window.location.href = window.location.pathname + window.location.search + '#';
        } else {
            window.location.href = window.location.pathname + window.location.search + "#";
        }
    }
_#-->
<div id="ClearSearch" class="ms-alignCenter">
    <h2><a onclick="clearSearchResults();"  style="cursor:pointer">Clear/Reset All</a></h2>
</div>
The source for the above code is Add a “Clear Filters” link to your search page in SharePoint 2013
December 17, 2015 / Kannan / 0 Comments
When we add the sp.js link to the SharePoint Webpart Page or simple ASPX Page and when the page loads we get the following error.
script5009 ‘type’ is undefined sp.js
The solution I saw in the web for this is, add Micrsofot Ajax script.
<script type="text/javascript" src="//ajax.aspnetcdn.com/ajax/4.0/1/MicrosoftAjax.js"></script>
Do note that this resolves the similar error which occurs when we add other SharePoint js files as well.
July 31, 2015 / Kannan / 0 Comments
Recently I came across an issue where the query string had unicode characters and ASP.NET’s “HttpUtility.UrlDecode” was not properly converting the characters. After searching few minutes came across the following solution posted by cjsharp1 at Stackoverflow.
private string GetQueryStringValueFromRawUrl(string queryStringKey)
{
    var currentUri = new Uri(HttpContext.Current.Request.Url.Scheme + "://" +
        HttpContext.Current.Request.Url.Authority +
        HttpContext.Current.Request.RawUrl);
    var queryStringCollection = HttpUtility.ParseQueryString((currentUri).Query);
    return queryStringCollection.Get(queryStringKey);
}
April 8, 2015 / Kannan / 0 Comments
Following is a simple table which I came across a post “Nine Options for Managing Persistent User State in Your ASP.NET Application”
Posting it here for easy reference. This lists out various ASP.NET Persistence methods.
| Persistence Method | Who Needs the Data? | For How Long? | How Much Data? |
| Application | All users | Until the next application restart | Can be almost any size—it will only be stored once |
| Cookie | One user | As short as desired, or for months or even years if the user doesn’t delete their cookies | Minimal, simple data |
| Form Post | One user | For the next request (can be reused across many requests) | Virtually any size—the data is sent back and forth with every page |
| Query String | One user or one group of users | For the next request (can be reused across many requests) | Minimal, simple data |
| Session | One user | As long as the user is active, plus a timeout period (typically 20 minutes) | Can be almost any size, but should be minimized since every user has their own separate session store |
| Cache | All users or a subset of users | As long or as short as needed | Can be used for large or small, simple or complex data |
| Context | One user | This request only | Can hold large objects, but typically does not since it is often used for every request |
| View State | One user | One Web form | Minimal; as with Form Post, this data is sent back and forth with every page |
| Config file | All users | Until the configuration file is updated | Can hold a lot of data; usually organized as many small strings or XML structures |
March 26, 2014 / Kannan / 2 Comments
WCF Service with SOAP, REST JSON & REST XML – 3 in 1 !

WCF has evolved a lot in the past few years. Currently expectations from end user are that, they should be able to use applications across multiple devices, be it Windows, Mac, mobile devices or web.
Service Oriented Architecture (SOA) is the right architecture when we have to deal with such a scenario. SOA helps multiple type of applications to consume and process data without the need to implement the back-end data access or business logics. Be it a Windows/OS-X desktops application or iOS/Android/Windows mobile applications.
In the case of Windows/ASP.NET web applications, web-service can expose SOAP based service which can be consumed and implemented easily using existing .NET frameworks.
For Mac applications REST as well SOAP can be consumed. Though SOAP consumption requires non traditional methods. With development tools like Xamarin it’s even easier.
For Mobile applications be it iOS based or Android based or Windows Mobile based or even Java based, they can consume REST based service in JSON/XML format and can be implemented easily.
Finally for web based applications we have Jquery which has direct support for JSON.
This post will explain how to enable all the three SOAP, REST JSON & REST XML in WCF Service along with a sample source code.
Let’s start by creating a WCF Service Application using Visual Studio and .NET Framework 4.5. You can use even Framework 4.0 or 3.5

Interface
Let’s modify interface so that operation contracts support REST Get and POST operations
- Set Attributes for each OperationContract (System.ServiceModel.Web.WebInvoke or System.ServiceModel.Web.WebGet) along with URI Template
[OperationContract]
[WebGet(UriTemplate = "/GetData/?value={value}")]//1. Added "WebGet" Attributes
string GetData(int value);
- For WebInvoke set Attribute with Method, UriTemplate & BodyStyle as Bare
[OperationContract]
[WebInvoke(Method = "POST", UriTemplate = "/GetDataUsingDataContract/", BodyStyle = WebMessageBodyStyle.Bare)]//2. Added "WebInvoke" Attribute with Method, UriTemplate & BodyStyle as Bare
CompositeType GetDataUsingDataContract(CompositeType composite);
Setting BodyStyle as Bare will allow the service to expect and respond with data type (json/xml) based on the “content-type: application/json or content-type: application/xml” which should be set as part of incoming request’s header.
Final Interface Code (Look into the highlighted lines)
using System;
using System.Collections.Generic;
using System.Linq;
using System.Runtime.Serialization;
using System.ServiceModel;
using System.ServiceModel.Web;
using System.Text;

namespace MixedWebService
{
    // NOTE: You can use the "Rename" command on the "Refactor" menu to change the interface name "IService1" in both code and config file together.
    [ServiceContract]
    public interface ITestService
    {
        [OperationContract]
        [WebGet(UriTemplate = "/GetData/?value={value}")]//1. Added "WebGet" Attributes
        string GetData(int value);

        [OperationContract]
        [WebInvoke(Method = "POST", UriTemplate = "/GetDataUsingDataContract/", BodyStyle = WebMessageBodyStyle.Bare)]//2. Added "WebInvoke" Attribute with Method, UriTemplate & BodyStyle as Bare
        CompositeType GetDataUsingDataContract(CompositeType composite);

        // TODO: Add your service operations here
    }

    // Use a data contract as illustrated in the sample below to add composite types to service operations.
    [DataContract]
    public class CompositeType
    {
        bool boolValue = true;
        string stringValue = "Hello ";

        [DataMember]
        public bool BoolValue
        {
            get { return boolValue; }
            set { boolValue = value; }
        }

        [DataMember]
        public string StringValue
        {
            get { return stringValue; }
            set { stringValue = value; }
        }
    }
}
Web.Config
Let’s modify the web.config so that it can support both SOAP as well as REST and allow the service to auto select the REST request and response formats.
For SOAP, add service behavior with name “DefaultServiceBehavior“. This should be under <system.servicemodel><behaviors><serviceBehaviors>
<behavior name="DefaultServiceBehavior">
  <serviceMetadata httpGetEnabled="true"/>
  <serviceDebug includeExceptionDetailInFaults="true"/>
</behavior>
For REST, add endpoint behavior with name “RESTEndPointBehavior“. This should be under <system.servicemodel><behaviors><endpointBehaviors>
Make sure automaticFormatSelectionEnabled is set to true in webHttp tag. This will allow the service to expect and respond with data type (json/xml) based on the “content-type: application/json or content-type: application/xml” which should be set as part of incoming request’s header.
<behavior name="RESTEndPointBehavior">
  <webHttp helpEnabled="true" automaticFormatSelectionEnabled="true"/>
</behavior>
Finally add service under <system.servicemodel><services>
<service name="MixedWebService.TestService" behaviorConfiguration="DefaultServiceBehavior"><!--Added Service with DefaultServiceBehavior as behaviorConfiguration-->
  <endpoint address="SoapService" binding="basicHttpBinding" contract="MixedWebService.ITestService"/><!--Added basicHttpBinding as SoapService-->
  <endpoint address="RestService" binding="webHttpBinding" behaviorConfiguration="RESTEndPointBehavior" contract="MixedWebService.ITestService"/><!--Added webHttpBinding as RestService with RESTEndPointBehavior as behaviorConfiguration-->
</service>
The endpoint SoapService uses basicHttpBinding where as endpoint RestService uses webHttpBinding.
The RESTEndPointBehavior behavior configuration will make sure the service uses automatic format selection.
Hence when the incoming request’s header has “content-type: application/json”, the service will expect a json based request data and respond with json data. If it has “content-type: application/xml”, the service will expect a xml based request data and respond with xml data.
Final Web.config code (Look into the highlighted lines)
<?xml version="1.0"?>
<configuration>
  <appSettings>
    <add key="aspnet:UseTaskFriendlySynchronizationContext" value="true" />
  </appSettings>
  <system.web>
    <compilation debug="true" targetFramework="4.5" />
    <httpRuntime targetFramework="4.5"/>
  </system.web>
  <system.serviceModel>
    <services>
      <service name="MixedWebService.TestService" behaviorConfiguration="DefaultServiceBehavior"><!--Added Service with DefaultServiceBehavior as behaviorConfiguration-->
        <endpoint address="SoapService" binding="basicHttpBinding" contract="MixedWebService.ITestService"/><!--Added basicHttpBinding as SoapService-->
        <endpoint address="RestService" binding="webHttpBinding" behaviorConfiguration="RESTEndPointBehavior" contract="MixedWebService.ITestService"/><!--Added webHttpBinding as RestService with RESTEndPointBehavior as behaviorConfiguration-->
      </service>
    </services>
    <behaviors>
      <serviceBehaviors>
        <behavior name="DefaultServiceBehavior"><!--Added DefaultServiceBehavior referenced at service tag above-->
          <serviceMetadata httpGetEnabled="true"/>
          <serviceDebug includeExceptionDetailInFaults="true"/>
        </behavior>
      </serviceBehaviors>
      <endpointBehaviors>
        <behavior name="RESTEndPointBehavior"><!--Added RESTEndPointBehavior referenced at service tag above-->
          <webHttp helpEnabled="true" automaticFormatSelectionEnabled="true"/><!--automaticFormatSelectionEnabled when set to true expects input and provides output based on the "content-type: application/json or content-type: application/xml" as part of incoming request's header. -->
        </behavior>
      </endpointBehaviors>
    </behaviors>
    <protocolMapping>
      <add binding="basicHttpsBinding" scheme="https" />
    </protocolMapping>
    <serviceHostingEnvironment aspNetCompatibilityEnabled="true" multipleSiteBindingsEnabled="true" />
  </system.serviceModel>
  <system.webServer>
    <modules runAllManagedModulesForAllRequests="true"/>
    <directoryBrowse enabled="true"/>
  </system.webServer>
</configuration>
Now let’s look into the part where the hosted service can be consumed and see if it works fine.
SOAP:
Launch the WCF Test Client using Visual Studio Command Prompt
Add the service and call each methods with appropriate inputs. You should be able to see a result similar to below.


For REST we will use Fiddler to compose and analyze the request and response.
Launch the fiddler, use the screenshots below to compose a request. Make a note that content-type header decides the message format.
Also the URL should end with “RestService” then operation
e.g http://localhost:5469/TestService.svc/RestService/GetData/?value=1
REST GET using XML:


REST POST using XML:


REST GET using JSON:


REST POST using JSON:


Note: In all the above scenarios, the input and output use the same data format.
November 7, 2013 / Kannan / 0 Comments
Recently out of normal development routine I was discussing with my development team regarding the IT side of SharePoint 2010.
One of the aspects we were discussing about was the “Disaster Recovery.” Being developers, “Disaster Recovery” was a mere term rather than an important IT aspect for them and I fastly realized it was slightly boring for them.
Post discussion I decided to give them some links so that they can refer when needed. Found out following were some of the links they can quickly read and understand.
Disaster Recovery for SharePoint 2010
Configure Disaster Recovery Farm with SharePoint 2010
SharePoint Server 2010 – 10 Steps to Disaster Recovery


